
When I was about 10 years old I discovered Supercar and went absolutely nuts for it. It was at a time when I was exploring the wider Gerry Anderson universe beyond shows like Thunderbirds, Stingray, and Captain Scarlet. Supercar‘s charming simplicity, both in terms of format and in the way that it was produced, made it very accessible. The rudimentary specials effects which became more and more sophisticated as the series went on never put me off, and in fact they intrigued me. Being able to actually see the nuts and bolts of how the show was put together was inspiring to me as a young film maker. The back projection and fly-by-wire techniques felt very achievable, even though they remain to be tricks that only seasoned professionals can pull off convincingly. Inspired as I was, and because I was also a young LEGO fan, I built my own models of Supercar, Black Rock Laboratory, and all the characters, and I made an episode all by myself. It wasn’t great by any means, but as a kid it was a pretty magical experience.
Fast forward almost 15 years and I’m still a Supercar fan, and I’m still a LEGO fan, but my collection of LEGO parts is a little bit bigger than it used to be. I thought it was about time I revisited this childhood favourite.

As with my Space Precinct Police Cruiser, I started building “the marvel of the age” with no plans or designs. For reference I had my model of Supercar from Product Enterprise, a few colour shots of the original models that are readily available online, and some vague memories of what my original LEGO model looked like – although I wasn’t planning on sticking to that design very closely.
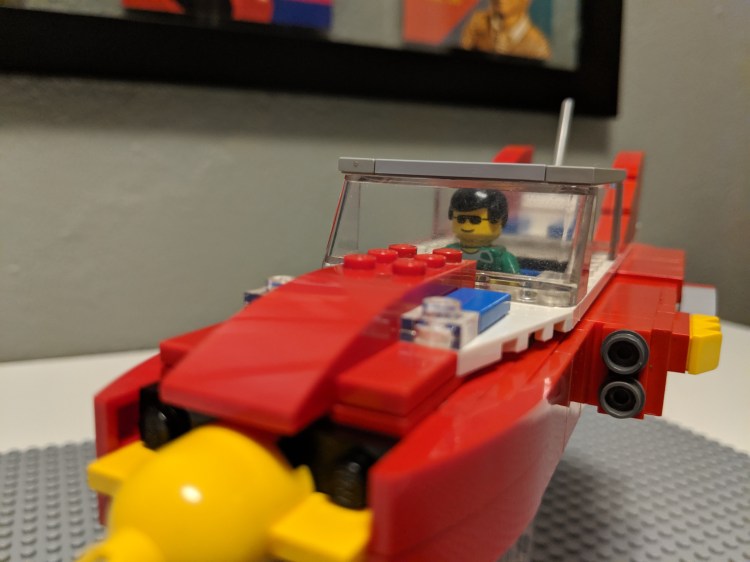
I started by gathering any red curved pieces I had to hand and tried to come up with the best way to construct Supercar’s nose section using SNOT (Studs Not On Top) building techniques to get the right curves in the right places. Fortunately the Product Enterprise model is in roughly the same scale as LEGO’s minifigures so it was relatively easy to mimic the same shape by eye. The width determined for the front of the model would obviously affect the size of the cabin and the back of the model so it was important to try out multiple options to find the right solution.
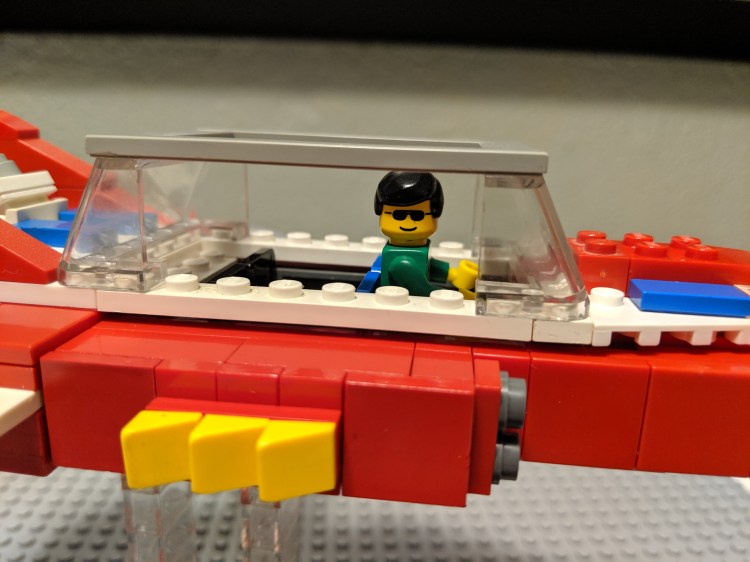
Getting the cabin right was quite a challenge. As with the Police Cruiser MOC, I was limited by my selection of windscreen pieces. Perfectly re-creating Supercar’s curved dome-like canopy wasn’t going to be possible with my part selection so I simply had to go with the widest windscreen pieces I had. I’m fairly certainly these exact same pieces were used on the model from my childhood. Often sections from the canopy of the original studio model were removed to allow for camera access or puppet wires, so I decided to leave the model without side or roof panels. In the series, all five members of the Supercar team are shown to (just about) fit in the cabin with the pilot seated at the controls on the port side. I tried to squeeze in as many seats as I could to give the illusion that everyone could climb in, but in reality the seating area is only four studs wide, and LEGO minifigures are just over two studs wide – meaning there is only space for a crew of two. For display purposes, however, only Mike needs to be sitting at the helm. The Mike Mercury minifigure I created uses the exact same pieces as the figure who starred in my childhood LEGO film.
SNOT construction was used along the sides of the car until I reached the rear of the cabin where the wing section started. Getting the shape of the swept wings right was something of an issue and in the end, the angle was so slight that I decided it would be easier to make them completely perpendicular to the car and ignore the sweep of the wings altogether. This presented an exciting possibility. With tile pieces and some carefully placed plates inside the body, I was actually able to make Supercar’s wing retractable, just as they appear in the television series.


I personally think that Supercar looks much more impressive with the wings extended, but it’s nice to have the option to tuck them away for landing. The back of the car was just built up using traditional studs on top construction with some black studs attached at the back to represent the exhausts. A careful selection of curved slopes formed the striking shape of the two rear fins. The blue panels surrounding the antenna couldn’t be made as large as they appear on the original model because of how much space the fins were taking up, but the features are at least hinted at. The antenna itself sits on top of a hinge semi-buried in the main body.
That about wraps up the build process. The whole model managed to come together over the course of an afternoon. She could probably benefit from the addition of a few decals to better match the original model, but for now this is the best rendition of a LEGO Supercar that I could possibly achieve. It’s a massive improvement on my old model, yet every time I look at her I’m transported back to a time when I was a pioneering young film maker dangling my Supercar model over a bathtub ready to re-create the opening titles… maybe history will repeat itself…
Stay tuned for more LEGO Gerry Anderson creations and feel free to add feedback and suggestions in the comments below!
